


- Web Browser:
- Google Chrome 50+
- Firefox 45+
- Apple Safari 8+ for OS X
- Microsoft Internet Explorer 11 / Edge
- Mobile Safari on iOS 7+
- Screen resolutions of 1280x1024 or higher for full desktop resolution. Tablet and mobile resolutions are also supported.
- Network connection
Cascade Manual
 CASCADE CMS Manual
Cascade Content Management System (CMS) is a web-based application supported by the Information Technology Department. It helps you to create, update, manage, and analyze accessible and branded content of TAMUG's websites.
Getting Started & Access
To be involved in the Cascade System for TAMUG, you will need to identify which website you’re interested in editing before access can be granted. Choosing a website to manage examples:
- As a student, you would be able to edit pages of affiliated club or campus organization.
- As a staff member, you could help edit your department’s website.
- If you are faculty, then you may require a website for your lab or learning center.
Once you know what website you’re interested in managing, then you need to request access to that site(s) from the site owner. CMS account requests should be sent at cms@tamug.edu.
Login to CMS
After receiving an email notification that your CMS account is ready, you will be able to log into Cascade CMS with your NetID username and password at https://tamu.cascadecms.com/.
- Client Machine Requirements (for content contributors)
- The Dashboard
- The Dashboard
Dashboard: Acts as landing page and houses widgets that provide quick access to information and pages you’ve worked on. You can modify the Dashboard by dragging and dropping widgets to suit your needs.
- The Site Menu
- The Site Menu

– The Home button opens the Dashboard.
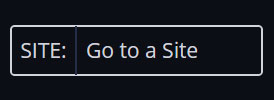
Click the Site dropdown menu to navigate between TAMUG's websites.
Select "LF-TAMUG" option to access our new "wide format" websites.
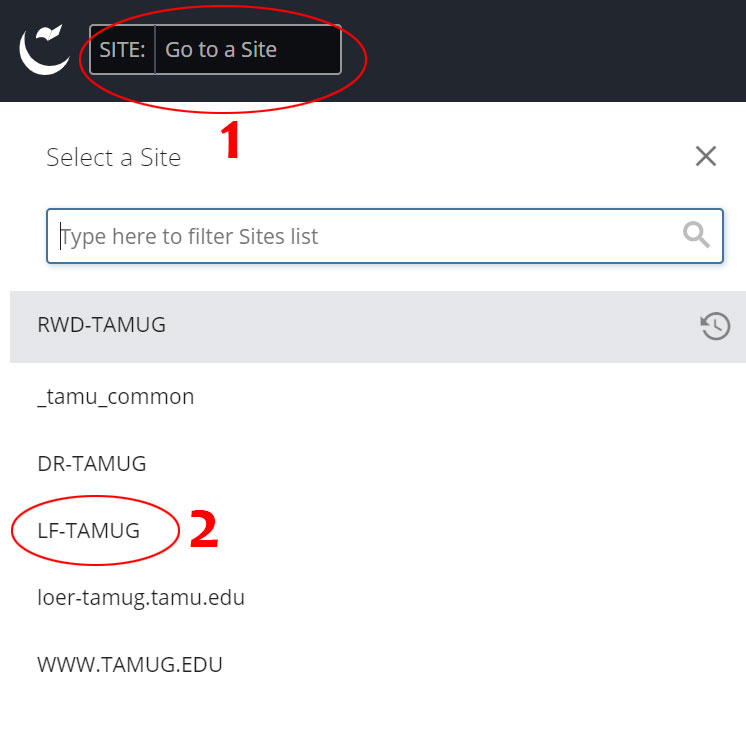
- User Settings and The Asset Tree
- User Settings and The Asset Tree
All tamug.edu website's folders, pages, and files are located in the left column asset tree. Cascade CMS provides two options to display asset links: by their system name (as in previous Cascade CMS versions) or by their Title or Display Name.
By default, if a folder, page, or file has a Title or Display Name metadata field filled out, it will appear on all asset links throughout your Cascade CMS environment. It is important to note that the formal paths and published filenames are different from what is shown in Cascade CMS with this display method.
To see the folders, pages and files by their system names, follow the steps:
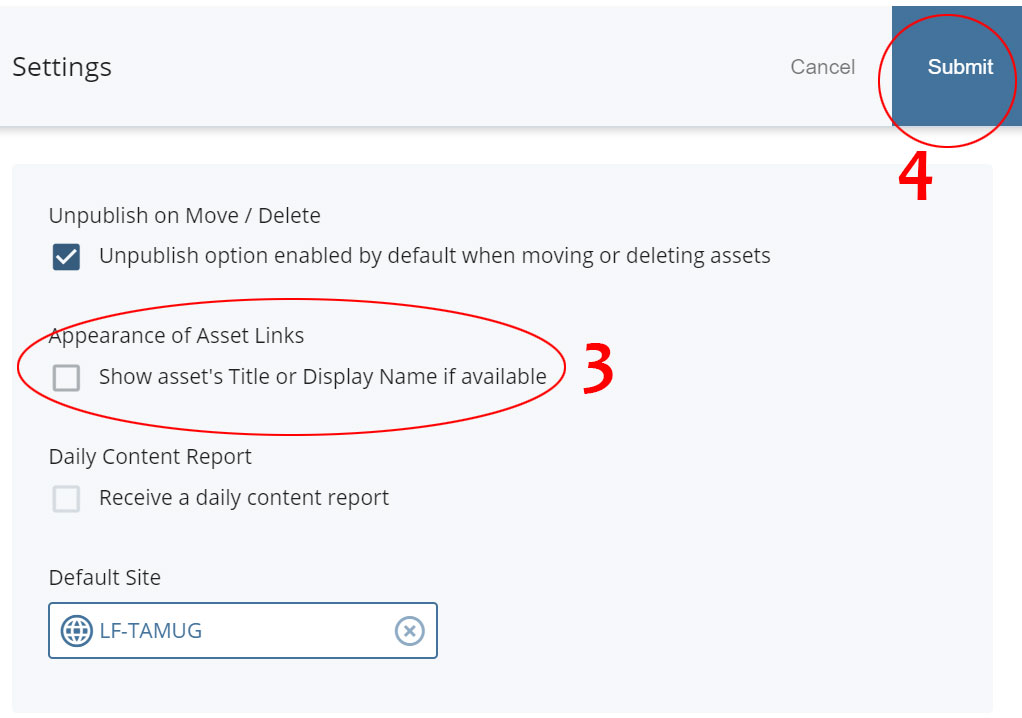
1) Click on the User Account menu icon to open drop-down menu.
2) Click on "Setings" option.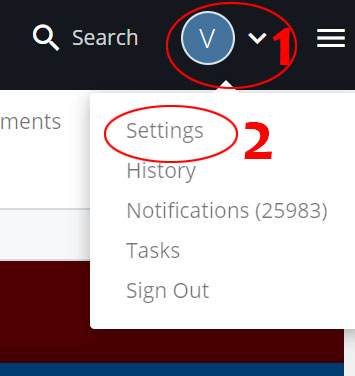
3) Uncheck "Show asset's Title or Display Name if available".
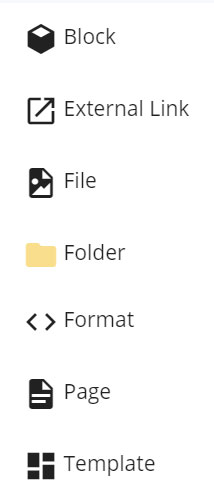
Asset Icons
Each icon represents a different kind of asset in Cascade Server:
Context Menu
Each asset in the asset tree has a Context Menu containing actions for that type of asset, such as Edit, View, etc. To open the Context Menu for an asset, simply right-click the asset, and then click on the desired action for that asset.
Please notice that if you're TAMUG web editor, you can only use the Edit, View, and Copy actions from the Context Menu drop-down. Please don't use "Delete", "Move", and "Rename" actions. If you need to rename or delete previously published pages or files, please send a request to TAMUG Web Publisheres at cms@tamug.edu to unpublish those assets from the server.
Folders
Folders are assets that are used to contain and organize other Home Area assets.
- Open / Close Folders
- Create a New Folder
- Create a New Folder
- Click

Fill in your new Folder Name with no spaces. Use dash if you want to separate words. The folder name becomes part of the URL. - Select Placement Folder and click "Choose", and click "Submit" to finish creating the folder.
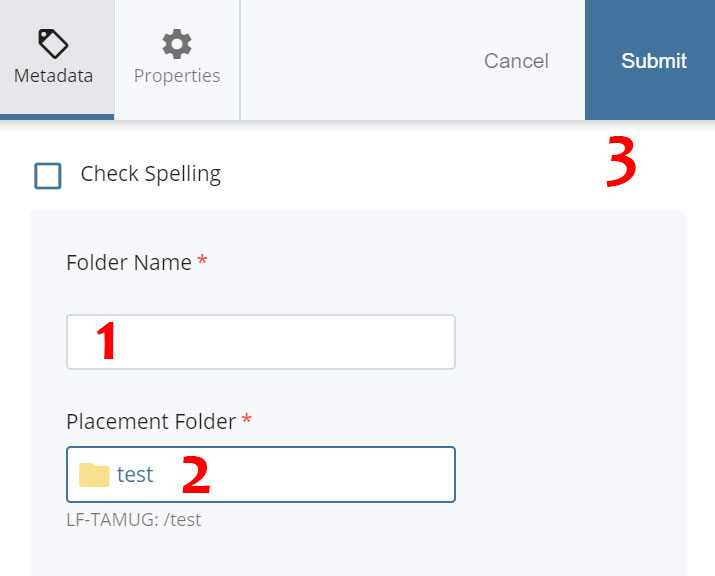
- Click
- Rename, Move, or Delete Folder
Pages
- Creating a New Page
- Creating a New Page
- Click

In the Page Name field, enter a name for your page with no spaces. Use dash if you want to separate words. This name becomes the system name of the page within CMS, and it will become part of the page's URL, so it's best to keep it short and simple.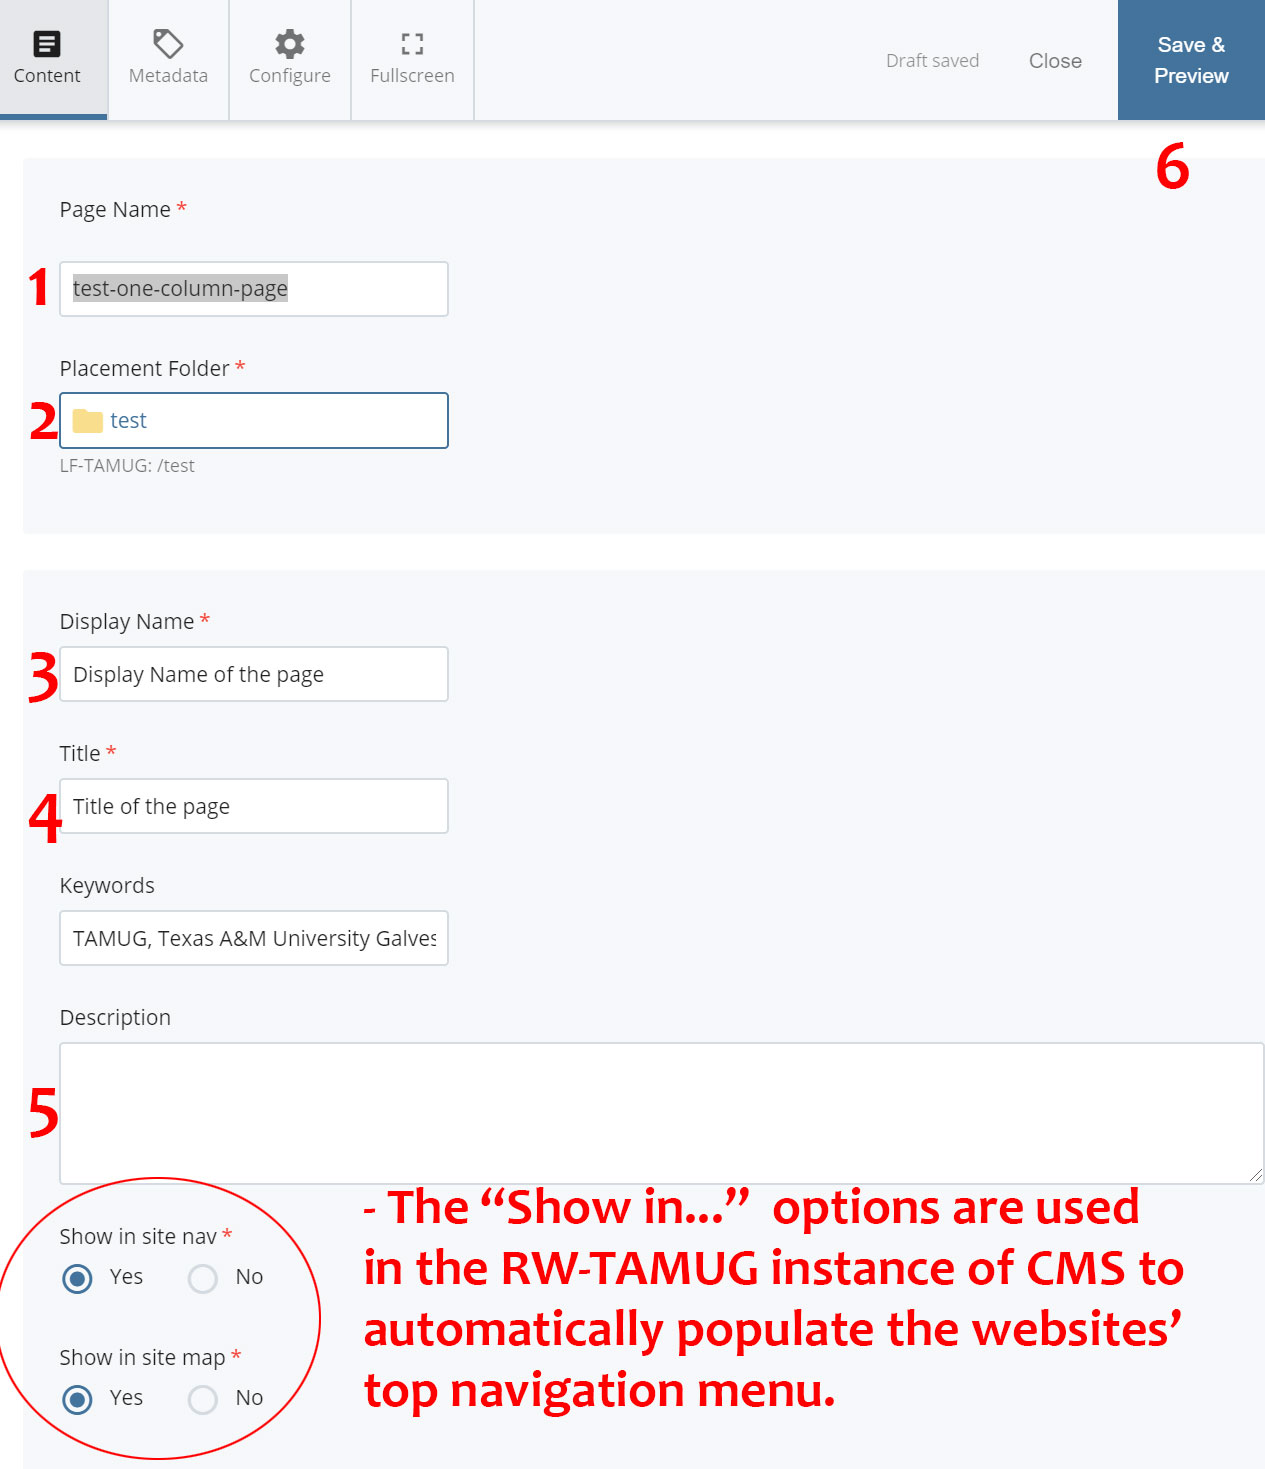
- In the Placement Folder field, choose the folder where the page should be created within Cascade.
- Enter a short Display Name used in CMS as a breadcrumb link or site map reference as well as in the top menu navigation for pages created under the RWD-TAMUG instance of CMS.
- Enter a Title. You can use the same text as in the Display Name field. The title (html tag <title>) displays at the top of the browser window or tab for this page. It also displays in the Google Search Results.
- Enter Keywords (words or phrases about the asset) and Description (the description of the asset).
Google Searh Results example:
- Click "Save and Preview" button to save the draft to see how the page will look as rendered in Cascade CMS. To save your draft as page click
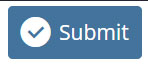 button.
Click "Check Content & Submit" to correct any errors in Accessibility, Broken Links and Spell Check.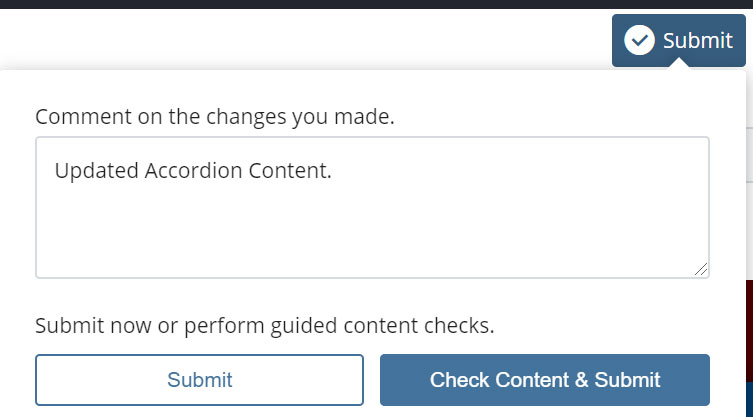
To finalize creating the new page click
- Click
- Editing a Page
- Editing a Page
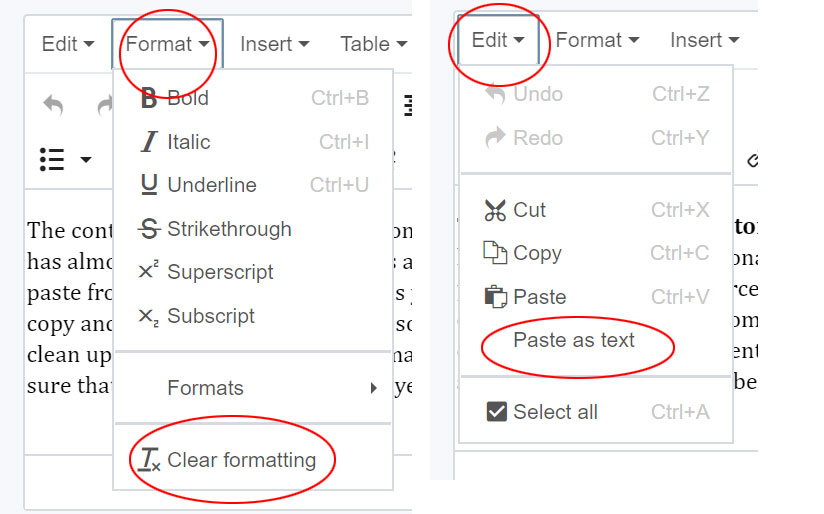
The content WYSIWYG editor (acronym for “What You See Is What You Get.”) integrated into Cascade Server has almost the same functionality as a standard editor. To insert or edit content, simply type in your text, or paste from an external source, just as you would in a standard word processor, such as Microsoft Word. If you copy and paste your text from Microsoft Word, click the “Clear Formatting” option under "Format" button to clean up the source document's formatting. You also can use "Past as Text" option under "Edit" button to make sure that your content will be displayed in the website's default fonts.
You can open the editor in full screen mode. To do this, click the “Full Screen” button
 . To close the full screen mode, click the button again.
 - Adding a Link
- Adding a Link
Adding Hyperlinks
- Highlight the text you want to hyperlink.
- Click on the chain link icon
 in the toolbar or right click on the text and select the chain icon on the Context Pop-Menu.
Add an Internal Hyperlink
- Select "Internal" if the page you are linking to is within Cascade.
- Click "Choose File, Page, or Link" and use Recent, Browse, or Upload option to locate the asset you want to make a link.
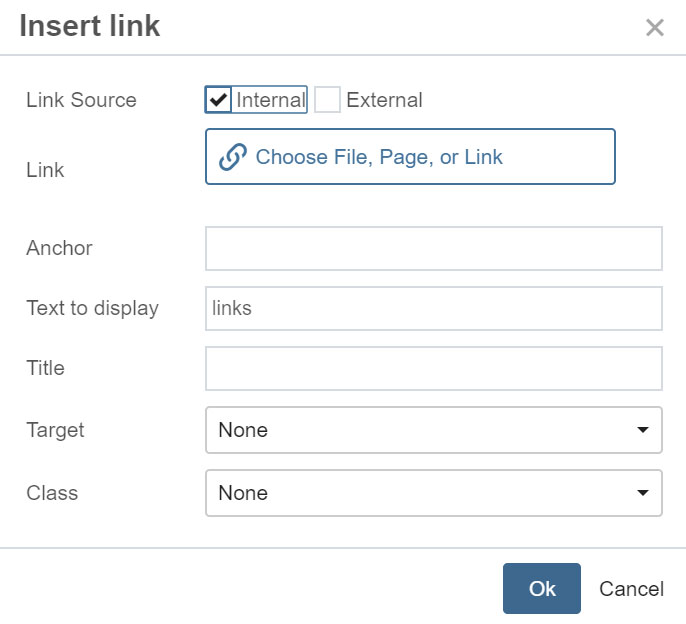
Add an External Hyperlink
- Select "External" check box if the page you are linking is NOT within Cascade (i.e. outside links)
- Enter the full URL of the external hyperlink in the "Link" box.
- Target allows you to choose whether clicking the link will open the page in the same window/tab or in a new one.

- Adding an Anchor
- Adding an Anchor
An anchor marks a specific spot withing a page. To add an achor you will need to create a link pointing to the anchor and the anchor itself with a unique ID.
In the WYSIWYG editor, position your coursor where you want to make an anchor. Click on the anchor icon located on the toolbar and type into the ID field a short and clear text that describes the target anchor. This ID will be part of your link with # in front of it.

Creating a link pointing to the anchor
In the Insert Link menu enter the same anchor ID and click "OK" button.
Please notice that anchor ID is case sensitive and should not have spaces between words.
You can also create a link to an anchor on another page, if you click the "Choose File, Page, or Link" button and select a target page with an anchor.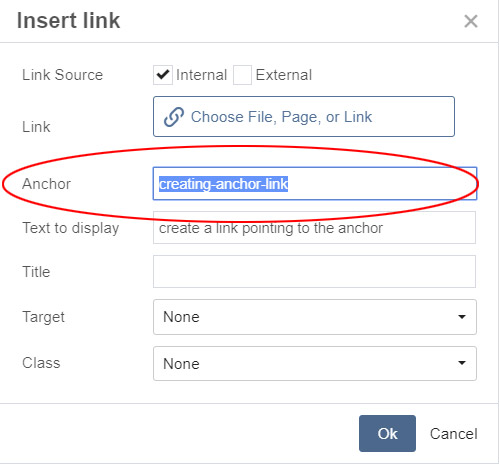
Images and Documents
- Uploading Images and Documents
- Uploading Images and Documents
- Click Add Content > Your Site > File.

- In the Name field, enter a name for your file.
- If you prefer to use the filename of the file you're uploading, leave this field blank and it will be filled automatically when a file is selected.
- If uploading multiple files, the filenames will be used by default.
- In the Placement Folder field, choose the folder where the file(s) should be uploaded.
- Select one or more files to upload by clicking the Choose link or by dragging and dropping files from your computer into the dotted drop zone.
- If uploading a text file, you'll be able to view and edit the contents of the file using the Advanced Code Editor.
- If uploading an image file, you'll be able to view and edit the image using the built-in image editor.
- Click Add Content > Your Site > File.
The "Wide Format" Template's Section Elements
Section Subtitle
Section Content. Section background color - #707373.
Column 1. Column background color #500000.
Column 1 for 3. Column background color #003C71.
Column 3. Column background color #5B6236.
Column 1 for 4. Column background color #744F28.
Column 4. Column background color #998542.
Column 1 for 6. Column background color #332C2C.
Column 6. Column background color #D6D3C4.
Column 2. Column background color #500000.
Column 2. Column background color #003C71.
Column 3. Column background color #5B6236.
Column 3. Column background color #744F28.
Column 3. Column background color #998542.
Section Accordion Header
- Accordion Title. (Accordion Title background color - "maroon-banner")